> ## Documentation Index
> Fetch the complete documentation index at: https://docs.nofire.ai/llms.txt
> Use this file to discover all available pages before exploring further.
# AWS
> Connect your AWS account with NOFire AI
Connecting your AWS account to NOFire AI enables automatic discovery and monitoring of your AWS infrastructure across multiple regions. NOFire AI discovers:
* **RDS Instances** - MySQL, PostgreSQL, MariaDB, Oracle, SQL Server databases
* **Aurora Clusters** - Including cluster members and read replicas
* **ElastiCache Clusters** - Redis and Memcached deployments
* **Lambda Functions** - Serverless functions with complete configuration
* **Multi-Region Support** - Discover resources across all your specified AWS regions
This metadata enhances NOFire AI's understanding of your infrastructure landscape, enabling deeper context for investigations and root cause analysis.
To ensure a smooth integration, we follow AWS's best practices by utilizing an assumed [role](https://docs.aws.amazon.com/IAM/latest/UserGuide/id_roles_create_for-custom.html) and [external ID](https://docs.aws.amazon.com/IAM/latest/UserGuide/id_roles_common-scenarios_third-party.html) for secure access.
## Step 1: Create IAM Role
Access the AWS Management Console using an account that has the necessary permissions to create IAM roles. Then, proceed with the steps outlined below:
1. **Access IAM:** Navigate to the IAM service in the AWS console.
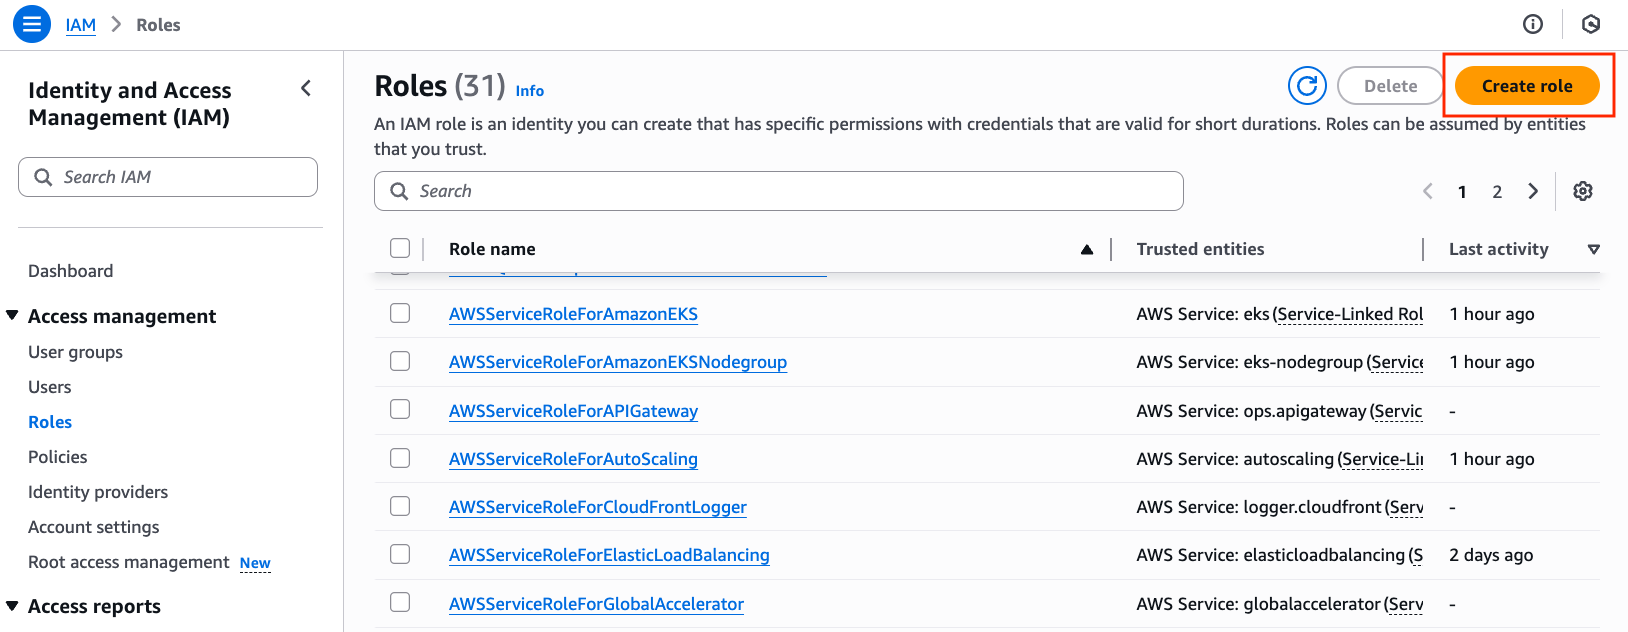
2. **Create a new role**: In the navigation pane on the left, choose **Roles** > **Create role**.
 3. **Enter credentials**:
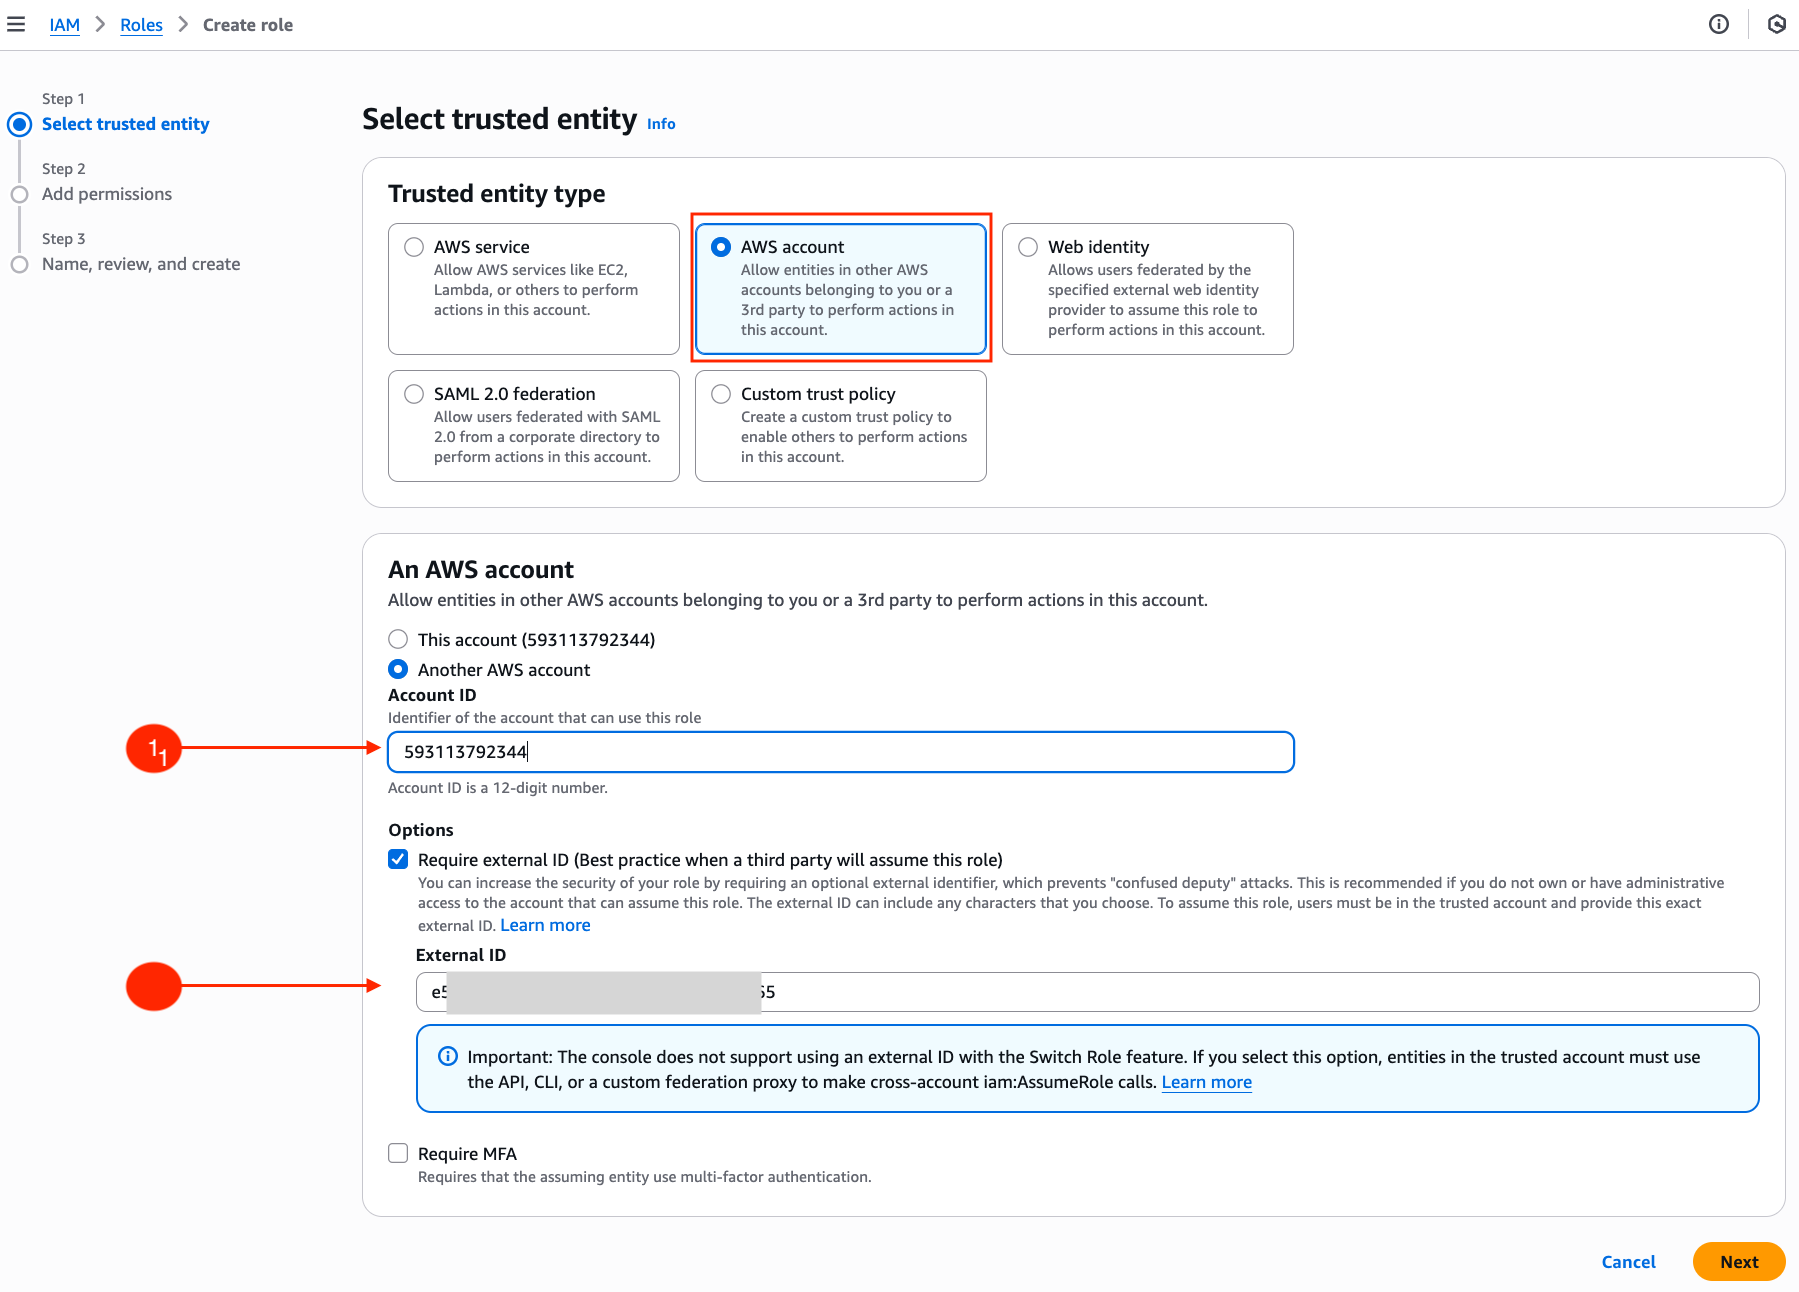
* **Add NOFire AI's Account ID**: In the **Account ID** input box, paste the NOFire AI AWS Account ID: **593113792344**. This will give us access to the IAM role.
* **Add an External ID**: Under **Options**, enter a unique external ID (you'll need this later). You can generate one or use the one provided in the NOFire AI dashboard.
3. **Enter credentials**:
* **Add NOFire AI's Account ID**: In the **Account ID** input box, paste the NOFire AI AWS Account ID: **593113792344**. This will give us access to the IAM role.
* **Add an External ID**: Under **Options**, enter a unique external ID (you'll need this later). You can generate one or use the one provided in the NOFire AI dashboard.
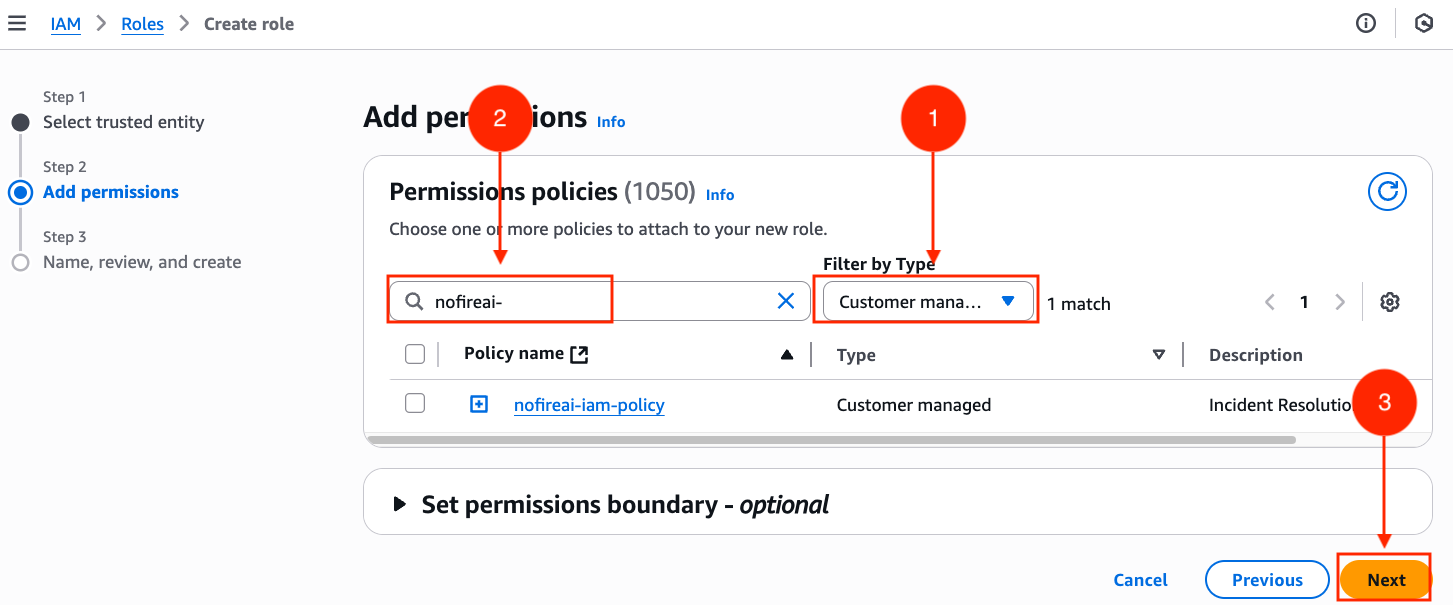
 4. **Assign permissions:** On the permissions console, search for and attach these **AWS managed policies**:
* **ReadOnlyAccess** - Provides comprehensive readonly access across all AWS services
* **CloudWatchLogsReadOnlyAccess** - Enables log querying and analysis
* **AmazonRDSPerformanceInsightsReadOnly** - Provides deep RDS database performance insights
AWS managed policies are automatically maintained and updated by AWS, ensuring you always have the latest permissions for new services without manual updates.
Search for "ReadOnlyAccess" in the AWS managed policies, select it, then repeat for the other two policies. Click **Next** when done.
4. **Assign permissions:** On the permissions console, search for and attach these **AWS managed policies**:
* **ReadOnlyAccess** - Provides comprehensive readonly access across all AWS services
* **CloudWatchLogsReadOnlyAccess** - Enables log querying and analysis
* **AmazonRDSPerformanceInsightsReadOnly** - Provides deep RDS database performance insights
AWS managed policies are automatically maintained and updated by AWS, ensuring you always have the latest permissions for new services without manual updates.
Search for "ReadOnlyAccess" in the AWS managed policies, select it, then repeat for the other two policies. Click **Next** when done.
 5. **Finalize and review**:
* **Role name**: Enter a descriptive name (e.g., `nofireai-readonly-role`)
* **Description**: Add an optional description (e.g., "NOFire AI readonly access for infrastructure discovery")
* Review the three attached policies and trust relationship
5. **Finalize and review**:
* **Role name**: Enter a descriptive name (e.g., `nofireai-readonly-role`)
* **Description**: Add an optional description (e.g., "NOFire AI readonly access for infrastructure discovery")
* Review the three attached policies and trust relationship
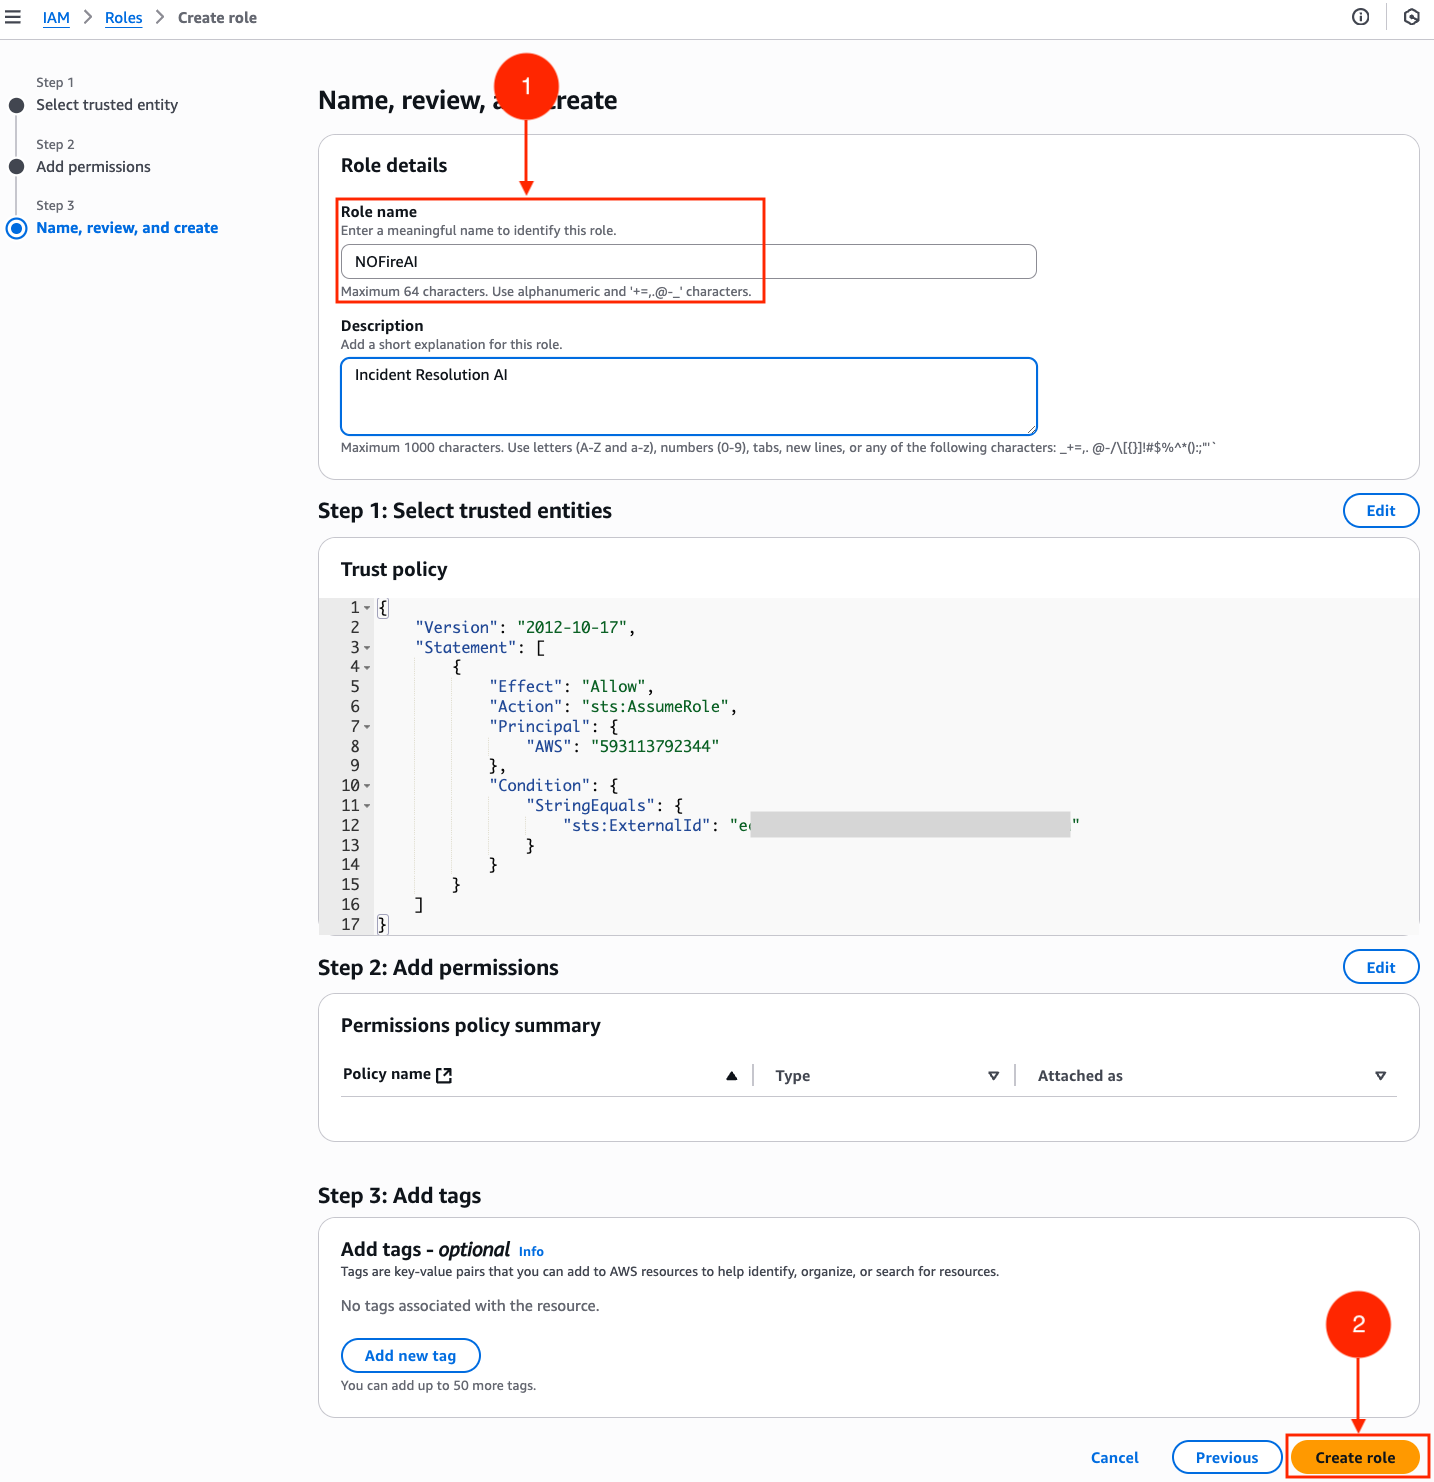 6. If everything looks correct, click the **Create role** button at the bottom right corner.
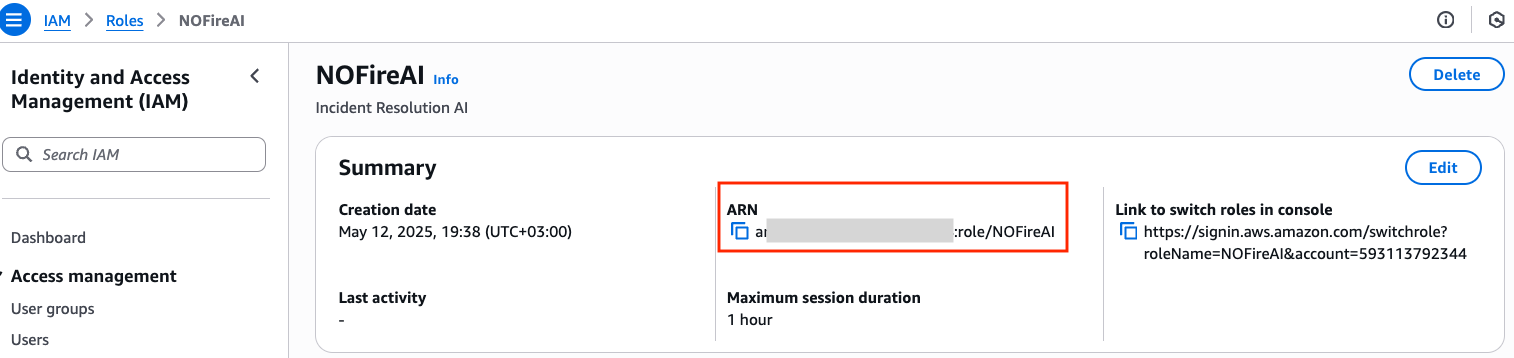
7. **Copy the Role ARN**: Once the role is created, navigate to it and copy the role ARN. You'll need this to complete the connection setup on the NOFire AI dashboard.
6. If everything looks correct, click the **Create role** button at the bottom right corner.
7. **Copy the Role ARN**: Once the role is created, navigate to it and copy the role ARN. You'll need this to complete the connection setup on the NOFire AI dashboard.
 For automation or scripting, you can create the IAM role using the AWS CLI:
```bash theme={null}
# Set your variables
NOFIREAI_ACCOUNT_ID="593113792344"
EXTERNAL_ID="your-unique-external-id"
ROLE_NAME="nofireai-readonly-role"
# Create trust policy
cat > trust-policy.json <
If you manage infrastructure with Terraform, copy the module below into your configuration. Set `external_id` to the value shown in the NOFire AI dashboard — keep it secret and never commit it to version control.
```hcl theme={null}
variable "external_id" {
type = string
description = "External ID provided by NOFire AI for the trust policy condition."
sensitive = true
}
variable "role_name" {
type = string
default = "nofireai-readonly-role"
description = "IAM role name assumed by NOFire AI."
}
locals {
nofireai_account_id = "593113792344"
}
data "aws_iam_policy_document" "nofireai_trust" {
statement {
effect = "Allow"
actions = ["sts:AssumeRole"]
principals {
type = "AWS"
identifiers = ["arn:aws:iam::${local.nofireai_account_id}:root"]
}
condition {
test = "StringEquals"
variable = "sts:ExternalId"
values = [var.external_id]
}
}
}
resource "aws_iam_role" "nofireai" {
name = var.role_name
assume_role_policy = data.aws_iam_policy_document.nofireai_trust.json
}
resource "aws_iam_role_policy_attachment" "readonly" {
role = aws_iam_role.nofireai.name
policy_arn = "arn:aws:iam::aws:policy/ReadOnlyAccess"
}
resource "aws_iam_role_policy_attachment" "cloudwatch_logs" {
role = aws_iam_role.nofireai.name
policy_arn = "arn:aws:iam::aws:policy/CloudWatchLogsReadOnlyAccess"
}
resource "aws_iam_role_policy_attachment" "rds_performance_insights" {
role = aws_iam_role.nofireai.name
policy_arn = "arn:aws:iam::aws:policy/AmazonRDSPerformanceInsightsReadOnly"
}
output "nofireai_role_arn" {
value = aws_iam_role.nofireai.arn
description = "Role ARN to share with NOFire AI."
}
```
Apply the configuration and copy the role ARN from the `nofireai_role_arn` output:
```bash theme={null}
terraform apply -var="external_id="
terraform output nofireai_role_arn
```
## Step 2: Add AWS Connection to NOFire AI
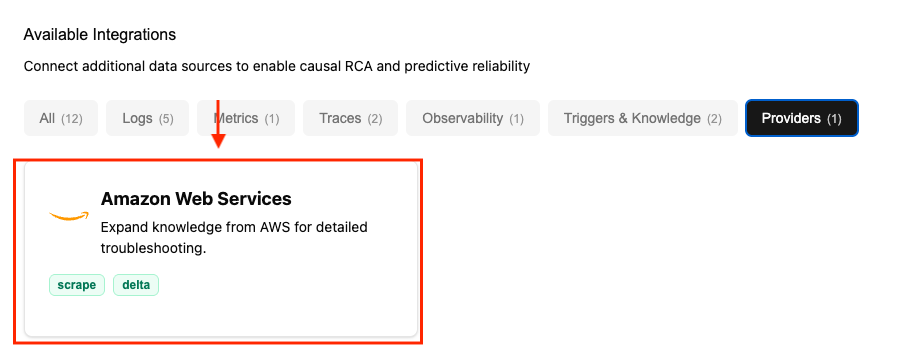
1. **Select AWS:** From the list of available connections, select AWS.
Click **Next** at the top right corner.
For automation or scripting, you can create the IAM role using the AWS CLI:
```bash theme={null}
# Set your variables
NOFIREAI_ACCOUNT_ID="593113792344"
EXTERNAL_ID="your-unique-external-id"
ROLE_NAME="nofireai-readonly-role"
# Create trust policy
cat > trust-policy.json <
If you manage infrastructure with Terraform, copy the module below into your configuration. Set `external_id` to the value shown in the NOFire AI dashboard — keep it secret and never commit it to version control.
```hcl theme={null}
variable "external_id" {
type = string
description = "External ID provided by NOFire AI for the trust policy condition."
sensitive = true
}
variable "role_name" {
type = string
default = "nofireai-readonly-role"
description = "IAM role name assumed by NOFire AI."
}
locals {
nofireai_account_id = "593113792344"
}
data "aws_iam_policy_document" "nofireai_trust" {
statement {
effect = "Allow"
actions = ["sts:AssumeRole"]
principals {
type = "AWS"
identifiers = ["arn:aws:iam::${local.nofireai_account_id}:root"]
}
condition {
test = "StringEquals"
variable = "sts:ExternalId"
values = [var.external_id]
}
}
}
resource "aws_iam_role" "nofireai" {
name = var.role_name
assume_role_policy = data.aws_iam_policy_document.nofireai_trust.json
}
resource "aws_iam_role_policy_attachment" "readonly" {
role = aws_iam_role.nofireai.name
policy_arn = "arn:aws:iam::aws:policy/ReadOnlyAccess"
}
resource "aws_iam_role_policy_attachment" "cloudwatch_logs" {
role = aws_iam_role.nofireai.name
policy_arn = "arn:aws:iam::aws:policy/CloudWatchLogsReadOnlyAccess"
}
resource "aws_iam_role_policy_attachment" "rds_performance_insights" {
role = aws_iam_role.nofireai.name
policy_arn = "arn:aws:iam::aws:policy/AmazonRDSPerformanceInsightsReadOnly"
}
output "nofireai_role_arn" {
value = aws_iam_role.nofireai.arn
description = "Role ARN to share with NOFire AI."
}
```
Apply the configuration and copy the role ARN from the `nofireai_role_arn` output:
```bash theme={null}
terraform apply -var="external_id="
terraform output nofireai_role_arn
```
## Step 2: Add AWS Connection to NOFire AI
1. **Select AWS:** From the list of available connections, select AWS.
Click **Next** at the top right corner.
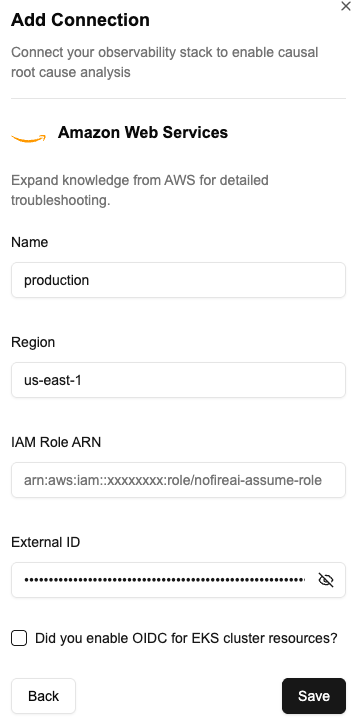
 2. **Enter connection details:**
* **Connection name** - A descriptive name for this connection (e.g., "Production AWS", "Staging Environment")
* **Role ARN** - The IAM role ARN you copied from AWS (e.g., `arn:aws:iam::123456789012:role/nofireai-readonly-role`)
* **External ID** - The unique external ID you used when creating the role
* **Regions** - Select one or more AWS regions to discover (e.g., us-east-1, us-west-2, eu-west-1)
2. **Enter connection details:**
* **Connection name** - A descriptive name for this connection (e.g., "Production AWS", "Staging Environment")
* **Role ARN** - The IAM role ARN you copied from AWS (e.g., `arn:aws:iam::123456789012:role/nofireai-readonly-role`)
* **External ID** - The unique external ID you used when creating the role
* **Regions** - Select one or more AWS regions to discover (e.g., us-east-1, us-west-2, eu-west-1)
 Only select regions where you have active resources to optimize discovery time and reduce costs.
Click **Save** to create the connection.
3. **Connection initialization:** Once the connection is established, NOFire AI automatically:
* Validates the IAM role and permissions
* Discovers RDS instances, Aurora clusters, ElastiCache clusters, and Lambda functions across specified regions
* Builds the infrastructure graph and tracks relationships
* Updates the connection status to **READY** when complete
You can monitor the connection status in the Connections dashboard.
Only select regions where you have active resources to optimize discovery time and reduce costs.
Click **Save** to create the connection.
3. **Connection initialization:** Once the connection is established, NOFire AI automatically:
* Validates the IAM role and permissions
* Discovers RDS instances, Aurora clusters, ElastiCache clusters, and Lambda functions across specified regions
* Builds the infrastructure graph and tracks relationships
* Updates the connection status to **READY** when complete
You can monitor the connection status in the Connections dashboard.